Optimize Customer Data with Standard and Custom Objects
Learning Objectives
After completing this unit, you’ll be able to:
- Describe the perks of using objects on the Salesforce CRM platform.
- Explain the difference between standard objects and custom objects.
- List the types of custom fields an object can have.
Overview of Objects
DreamHouse is a realty company that provides a way for customers to shop for homes and contact real estate agents online. DreamHouse brokers use some of the standard Salesforce CRM functionality, like contacts and leads, to manage customer data of home buyers.
But when it comes to selling houses, there are a lot more things they want to track. For example, Salesforce doesn’t include a standard way to track properties. How is DreamHouse supposed to know which homes they have for sale or how much each home costs?
Luckily, the Salesforce admin, D’Angelo, knows that the Salesforce platform offers a solution. And you can work with D’Angelo to see what he’s building.
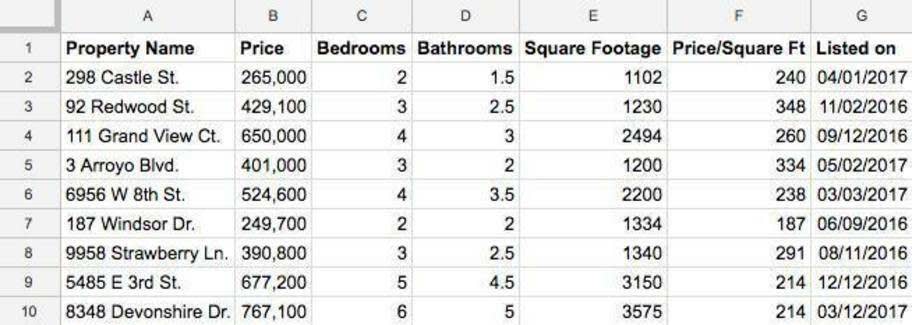
Start with the data model. A data model is more or less what it sounds like. It’s a way to model what database tables look like in a way that makes sense to humans. If you’re not familiar with databases, think about storing data in a spreadsheet. For example, D’Angelo can use a spreadsheet to track all DreamHouse’s properties. Columns can store the address, cost, and other important attributes. Rows can store this information for each property that DreamHouse is selling. Database tables are set up in a similar way.

But looking at data in tables isn’t ideal for humans. That’s where the data model comes in.
In Salesforce CRM, we think about database tables as objects, we think about columns as fields, and rows as records. So instead of an account spreadsheet or table, we have an Account object with fields and a bunch of identically structured records.

When we talk about the data model, we’re talking about the collection of objects and fields in an app. Learn more about objects and fields so you can start building your own data model.
Get to Know Objects
Salesforce supports several different types of objects. There are standard objects, custom objects, external objects, platform events, and BigObjects. In this module, we focus on the two most common types of objects: standard and custom.
Standard objects are objects that are included with Salesforce. Common business objects like Account, Contact, Lead, and Opportunity are all standard objects.
Custom objects are objects that you create to store information that’s specific to your company or industry. For DreamHouse, D’Angelo wants to build a custom Property object that stores information about the homes his company is selling.
Objects are containers for your information, but they also give you special functionality. For example, when you create a custom object, the platform automatically builds things like the page layout for the user interface.
Create a Custom Object
Follow along as D’Angelo to see how he builds the Property object. You need this object later, so don’t skip these steps!
- Scroll to the bottom of this page and create a trailhead playground. Don’t skip this step! You need to use a fresh and clean Trailhead Playground for this module.
Note: Even if you're completing this module as part of the Admin Beginner trail, be sure and create a new Trailhead Playground to complete these steps. You don't need to reinstall the Dreamhouse app in the new playground org.
- Once your playground is created (it takes a minute!), press Launch.
- Click the gear icon
 at the top of the page and launch setup.
- Click the Object Manager tab.
- Click Create | Custom Object in the top-right corner.
- For Label, enter
Property. Notice that the Object Name and Record Name fields auto-fill.
- For Plural Label, enter
Properties.
- Prior to saving the custom object, scroll to the bottom of the page and select the checkbox Launch New Custom Tab Wizard after saving this custom object.
- Leave the rest of the values as default and click Save.
- On the New Custom Object Tab page, click the Tab Style field and select a style you like. The style sets the icon to display in the UI for the object.
- Click Next, Next, and Save.
Great job! You just created your first custom object. Now, learn about adding fields to this object.
Get to Know Fields
Every standard and custom object has fields attached to it. Get familiar with the different types of fields.
Field Type |
What is it? |
Can I get an example? |
|---|---|---|
Identity |
A 15-character, case-sensitive field that’s automatically generated for every record. You can find a record’s ID in its URL. |
An account ID looks like 0015000000Gv7qJ. |
System |
Read-only fields that provide information about a record from the system, like when the record was created or when it was last changed. |
CreatedDate, LastModifiedById, and LastModifiedDate. |
Name |
All records need names so you can distinguish between them. You can use text names or auto-numbered names that automatically increment every time you create a record. |
A contact’s name can be Julie Bean. A support case’s name can be CA-1024. |
Custom |
Fields you create on standard or custom objects are called custom fields. |
You can create a custom field on the Contact object to store your contacts’ birthdays. |
Identity, system, and name fields are standard on every object in Salesforce. Each standard object also comes with a set of prebuilt, standard fields. You can customize standard objects by adding custom fields, and you can add custom fields to your custom objects.
Every field has a data type. A data type indicates what kind of information the field stores.
Salesforce supports a bunch of different data types, but here are a few you’ll run into.
-
Checkbox—for fields that are a simple “yes” or “no,” a checkbox field is what you want.
-
Date or DateTime—these field types represent dates or date/time combinations, like birthdays or sales milestones.
-
Formula—this special field type holds a value that’s automatically calculated based on a formula that you write. For example, D’Angelo can write a formula field that automatically calculates a real estate agent’s commission on a home sale.
Again, there are quite a few field types, but most of them are fairly self-explanatory. The important takeaway here is that you want to think about what kind of data you’re trying to store when you create a custom field.
Create a Custom Field
The Property object you just created is pretty bare-bones. Add some custom fields to it. Head back to your Trailhead Playground.
- From Setup, go to Object Manager | Property.
- In the sidebar, click Fields & Relationships. Notice that there are already some fields there. There’s a name field and some of the system fields you learned about earlier.
- Click New in the top right.
- For data type, select Currency.
- Click Next.
- Fill out the following:
- Field Label:
Price - Description:
The listed sale price of the home.
- Field Label:
- Check the Required box.
- Click Next, Next again, and then Save.
You’ll see your new Price field in the list of Property fields. In the Field Name column, notice that it says Price__c. The “__c” part is an easy way to tell that a particular field is a custom field.
Create a Record
Now, create a property record to see what you did.
- From the App Launcher (
 in the navigation bar), find and select Sales.
- Click the Properties tab in the navigation bar. If you don’t see it, look under the More dropdown.
- Click New in the top corner.
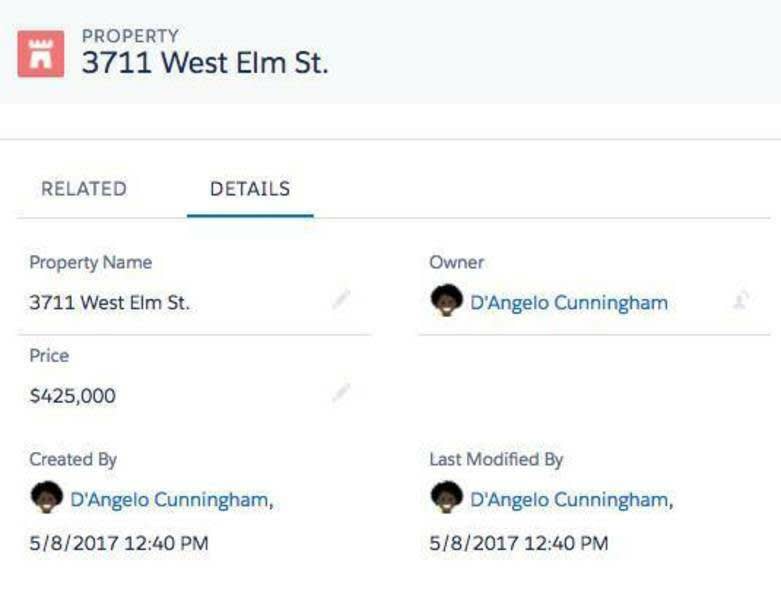
- Enter a name and price for the property and click Save.
Awesome! You’ll see something like the following.

Customize Responsibly. While it can seem easy to add and customize objects, remember that what’s going on under the hood is technically complicated. Here are some best practices to keep in mind as you start customizing your own org.
Be thoughtful about names. Once you start creating a bunch of objects, it can be tempting to give them “lazy” names. For example, if D’Angelo created another custom object to track condominiums, he might be tempted to name it Property2 instead of Condominium. That’s a recipe for confusion in your org. Give your objects and fields descriptive, unique names to improve clarity.
Help out your users. Even with careful naming, your users might not always be clear about the purpose of a particular object or field. Include descriptions for your custom objects and fields. For specialized or complicated customizations, use help text to give more details.
Require fields when necessary. Sometimes, you’ll want to force your users to fill out a field when they’re creating a record on a certain object. Every property needs a price, right? Make important fields required to avoid incomplete data.
Resources
-
Salesforce Help: Customize Your Salesforce Org
-
Salesforce Help: Store Information That’s Unique to Your Organization
-
Trailblazer Community: Customer Success Community
-
Knowledge Article: Custom Objects, Tabs, and Fields Best Practice Guide

